My New DIY Project.......Aged Roll Top Desk
So, I was given this desk by a sweet friend that was given it years ago by her former employer. She was updating and decided to get rid of it. She asked me if I wanted it....ARE YOU KIDDING ME....uhmmmm that would be a YES!!! The only catch was, I could never sell it...if I decide to ever get rid of it, I had to give it away. DEAL!
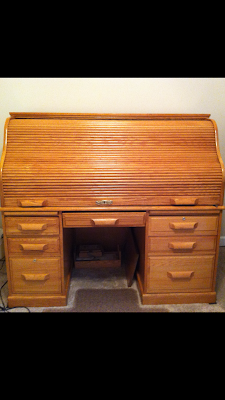 |
| Before - Outside |
 |
| Before - Inside |
I have been contemplating the new chalk paint that has been a popular trend here lately and decided this would be the PERFECT piece to try it on.
Let me just say this thing is a MONSTER of a desk and heavy as all get out!!!--just ask my husband and my dad!!! Anyway, I took it apart...COMPLETELY....and decided the best thing to do was start painting the bigger pieces in the carport and take the smaller/lower parts upstairs and paint them in the place it would occupy.
I decided to try a paint recipe I found on Pinterest and get started!! There is an assortment of recipes on there, I just picked the best one that suited what I already had on hand. Of course I had to buy plaster of paris and polycrylic but other than that, I already had plenty of white latex paint....so I was all set!
I removed all the hardware and painted the first coat on all the pieces, let dry thoroughly for a few days (I still have to work ya know) and came back and added another coat of paint so it would be completely covered.
These are pictures after the first coat of paint:


After the 2nd coat:
Another Pinterest idea I found was to paint the insides of the drawers. I decided on Aqua to go with the theme of the room. I used spray paint to do the drawers...it worked out nicely and allowed me to take them outside, spray them, then put the hardware back on and put them back in the desk to paint the fronts. I also painted the slide outs Aqua too.....
Drawers:
Ok, Here's where the waiting game began....Don't get me wrong....I LOVE the desk, but the bright white almost made it seem to stick out like a sore thumb in the middle of the room....it was just too stark white...what to do? what to do?

Well....I've heard all these wonderful things about chalk paint and waxing and clear wax with dark wax. Sounded like a wonderful idea, right? Well....not if you are going to "use" it frequently per the Home Depot experts!!! Hmmm....ok, now what? Back to the computer and ole Pinterest!!! I took about a week researching different ideas, things other people did, advice of people who had done the same thing and what worked best and not so good for them. Finally deciding to use a polycrylic to seal the paint. (I learned that if I didn't seal it, and decided to distress it and tone it down with some type of dark wax or glaze then whatever I used for that could "tint" the paint and I did not want to ruin the hard work I had already put into it). I added one coat of polycrylic and brushed it on with a paint brush, let dry thoroughly for a day then used a sanding block and both fine and course grit
sand paper to distress it.
Then came the glaze. I used a can of Rust-oleum Decorative Glaze I bought from Home Depot and used on my previous cabinet make over. I painted the glaze on and immediately wiped it back off leaving it in the creases and corners as much as possible going back and adding it after the first coat dried anywhere i thought needed a little extra. I let that dry overnight. Once all that was done I went back and put two more coats of polycrylic over it to seal it and ensure a lasting finish!
I also took all the old hardware and spray painted them silver to give it an updated look!
Whala!!!! New Desk and I must say I am very happy with the results!!! I also updated the picture with another one and added some other decor....Needless to say...she doesn't have to worry about me ever trying to get rid of it....I LOVE IT!!! Thank you for looking!!!
Items I used for this project:


